Managing User Properties
Administrators with the applicable roles associated to their user IDs may select a user in the Users pane on the Manage Roles page, and then manage the user's properties in the Properties pane. Administrators can view only the roles defined for their organizations and suborganizations.
IMPORTANT: To avoid organization ID conflicts, administrators must not create suborganizations below the parent organization. Equally, they must not delete existing organizations.
Note: Users may have roles defined and assigned from a parent organization that is not visible to the administrator of the user’s organization.
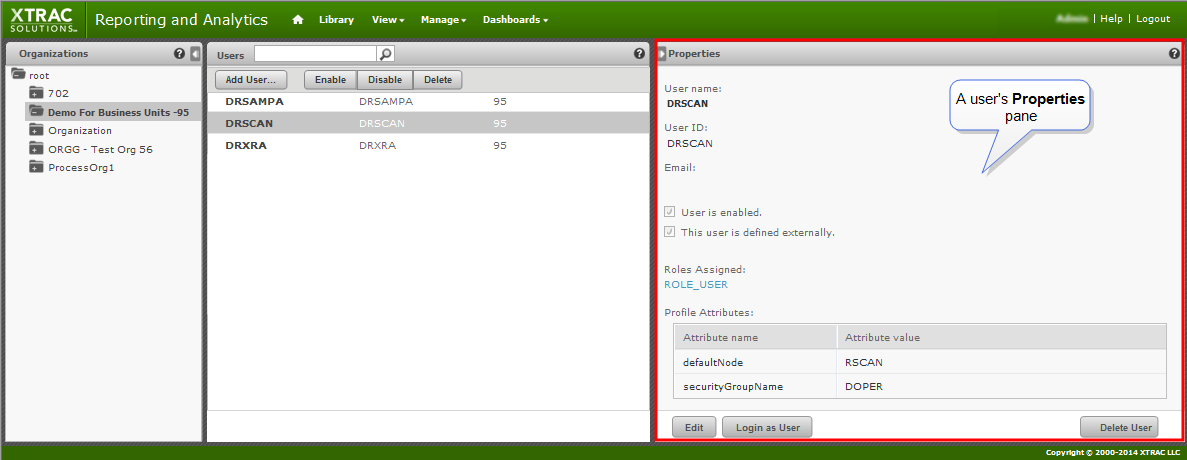
The properties include the user’s name, user ID, email address, assigned roles, user status, and profile attributes.
User status can be enabled or disabled. Disabled users display in gray in the list of users. The Roles Assigned names link to the Manage Roles page for each role.
You can do the following in the user's Properties pane.
Managing User properties
In the user Properties pane, you can assign roles to a user when you initially add a user to an organization. XRA automatically assigns the default user role (ROLE_USER) to any new user. Subsequently, you can add and remove roles for a user by editing the user's Properties pane.
Note: When you edit roles on the Manage Roles page, you can also assign users to roles. See Managing Role Properties.
To assign and edit:
| 1. | Log in as an administrator for the relevant organization. |
| 2. | Open the user Properties pane. Do one of the following: |
- On the XRA menu , select Manage > Users.
- On the administrator Home page, click the Manage Users icon.
| 3. | In the Organizations pane, select the user's organization. The Users pane displays the users in the selected organization and suborganizations. |
| 4. | In the Users pane, select the user to display the user's account details in the Properties pane. |
| 5. | In the Properties pane, click Edit. |
The Properties tab displays in editable mode. The Attributes tab appears beside it.
| 6. | Change any of the following: user name, email, password, and enabled status. |
Note: You cannot edit the user ID on the Properties pane. It retains the ID that was entered when the user was created.
| 7. | You can do the following in the Roles Available and Roles Assigned lists: |
- Use the search box list at the top of a list to find the available or assigned role.
- To assign a role to a user, select the role in the Roles Available list, and then click the right-arrow button to move it to the Roles Assigned list.
- To remove a role from a user, select the role in the Roles Assigned list, and then click the left arrow to move it back to the Roles Available list.
Note: The Roles Available list includes roles in the organizations of the current administrator, as well as some system-wide roles.
| 8. | Click Save to accept the changes, or click Cancel to confirm that you want to stop editing without saving any changes. |
| 9. | To test the user's permissions after you save the edits, click Login as User. |
The selected user's Home page appears. The login details show the name of the user appended to your login name in the upper-right corner.
| 10. | To check if the user has the correct permissions, browse the repository's folders and reports. |
| 11. | After you verify the user's access to folders and reports, click Logout in the top right corner to return to your own session's last page. |
Managing User Attributes
Administrators can define profile attributes for each user. The attributes can restrict a user's access to data through domain security files and OLAP schemas. Rather than accessing the repository database; you can manage profile attributes for user accounts on the Manage > Users page.
To add, edit, or delete profile attributes
| 1. | Log in as an administrator for the relevant organization. |
| 2. | Open the user Properties pane. Do one of the following: |
- On the XRA menu , select Manage > Users.
- On the administrator Home page, click the Manage Users icon.
| 3. | In the Organizations pane, select the user's organization. |
The Users pane displays the users in the selected organization and suborganizations.
| 4. | In the Users pane, select the user to display the user's account details in the Properties pane. |
| 5. | In the Properties pane, click Edit. |
| 6. | Select the Attributes tab on the Properties pane. |
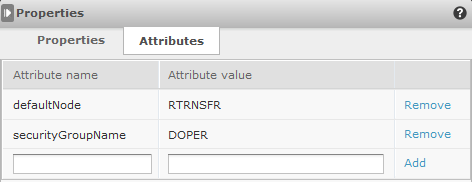
| 7. | You can do the following: |
- To create a new attribute, enter an attribute name and a value, and then click Add.
- To delete an attribute, click Remove in the relevant row.
- To edit an attribute, delete it and add it again with the required value.
Note: To add multiple values for an attribute, use a comma-separated list in the value field. Furthermore, you cannot add two attributes with the same name.
| 8. | Click Save. |
The new attributes appear in the Profile Attributes table, on the user’s Properties pane.